🔺 Metal Tutorial 1 — Hello Triangle
Metal Tutorial 1
In this tutorial, we will learn how to set up a Metal project and render a simple triangle on the screen.
Prerequisites
A basic understanding of swift, and graphics programming is required. There are already a lot of resources that can help to start with the basics, here some suggestions:
- Swift Programming Language
- Learn OpenGL
- Metal by Example
- Metal Programming Guide
- scratchapixel
- Real-Time Rendering
- Computer Graphics: Principles and Practice
If you are still here 🤗, clone the repository from the GitHub repository.
Setting up the project
Open the file MTMetalTutorialsApp.swift and ensure that the view is set up correctly with the MT1ContentView.
@main
struct MetalTutorialsApp: App {
    var body: some Scene {
        WindowGroup {
            // substitute here to choose the tutorial
            MT1ContentView()
        }
    }
}
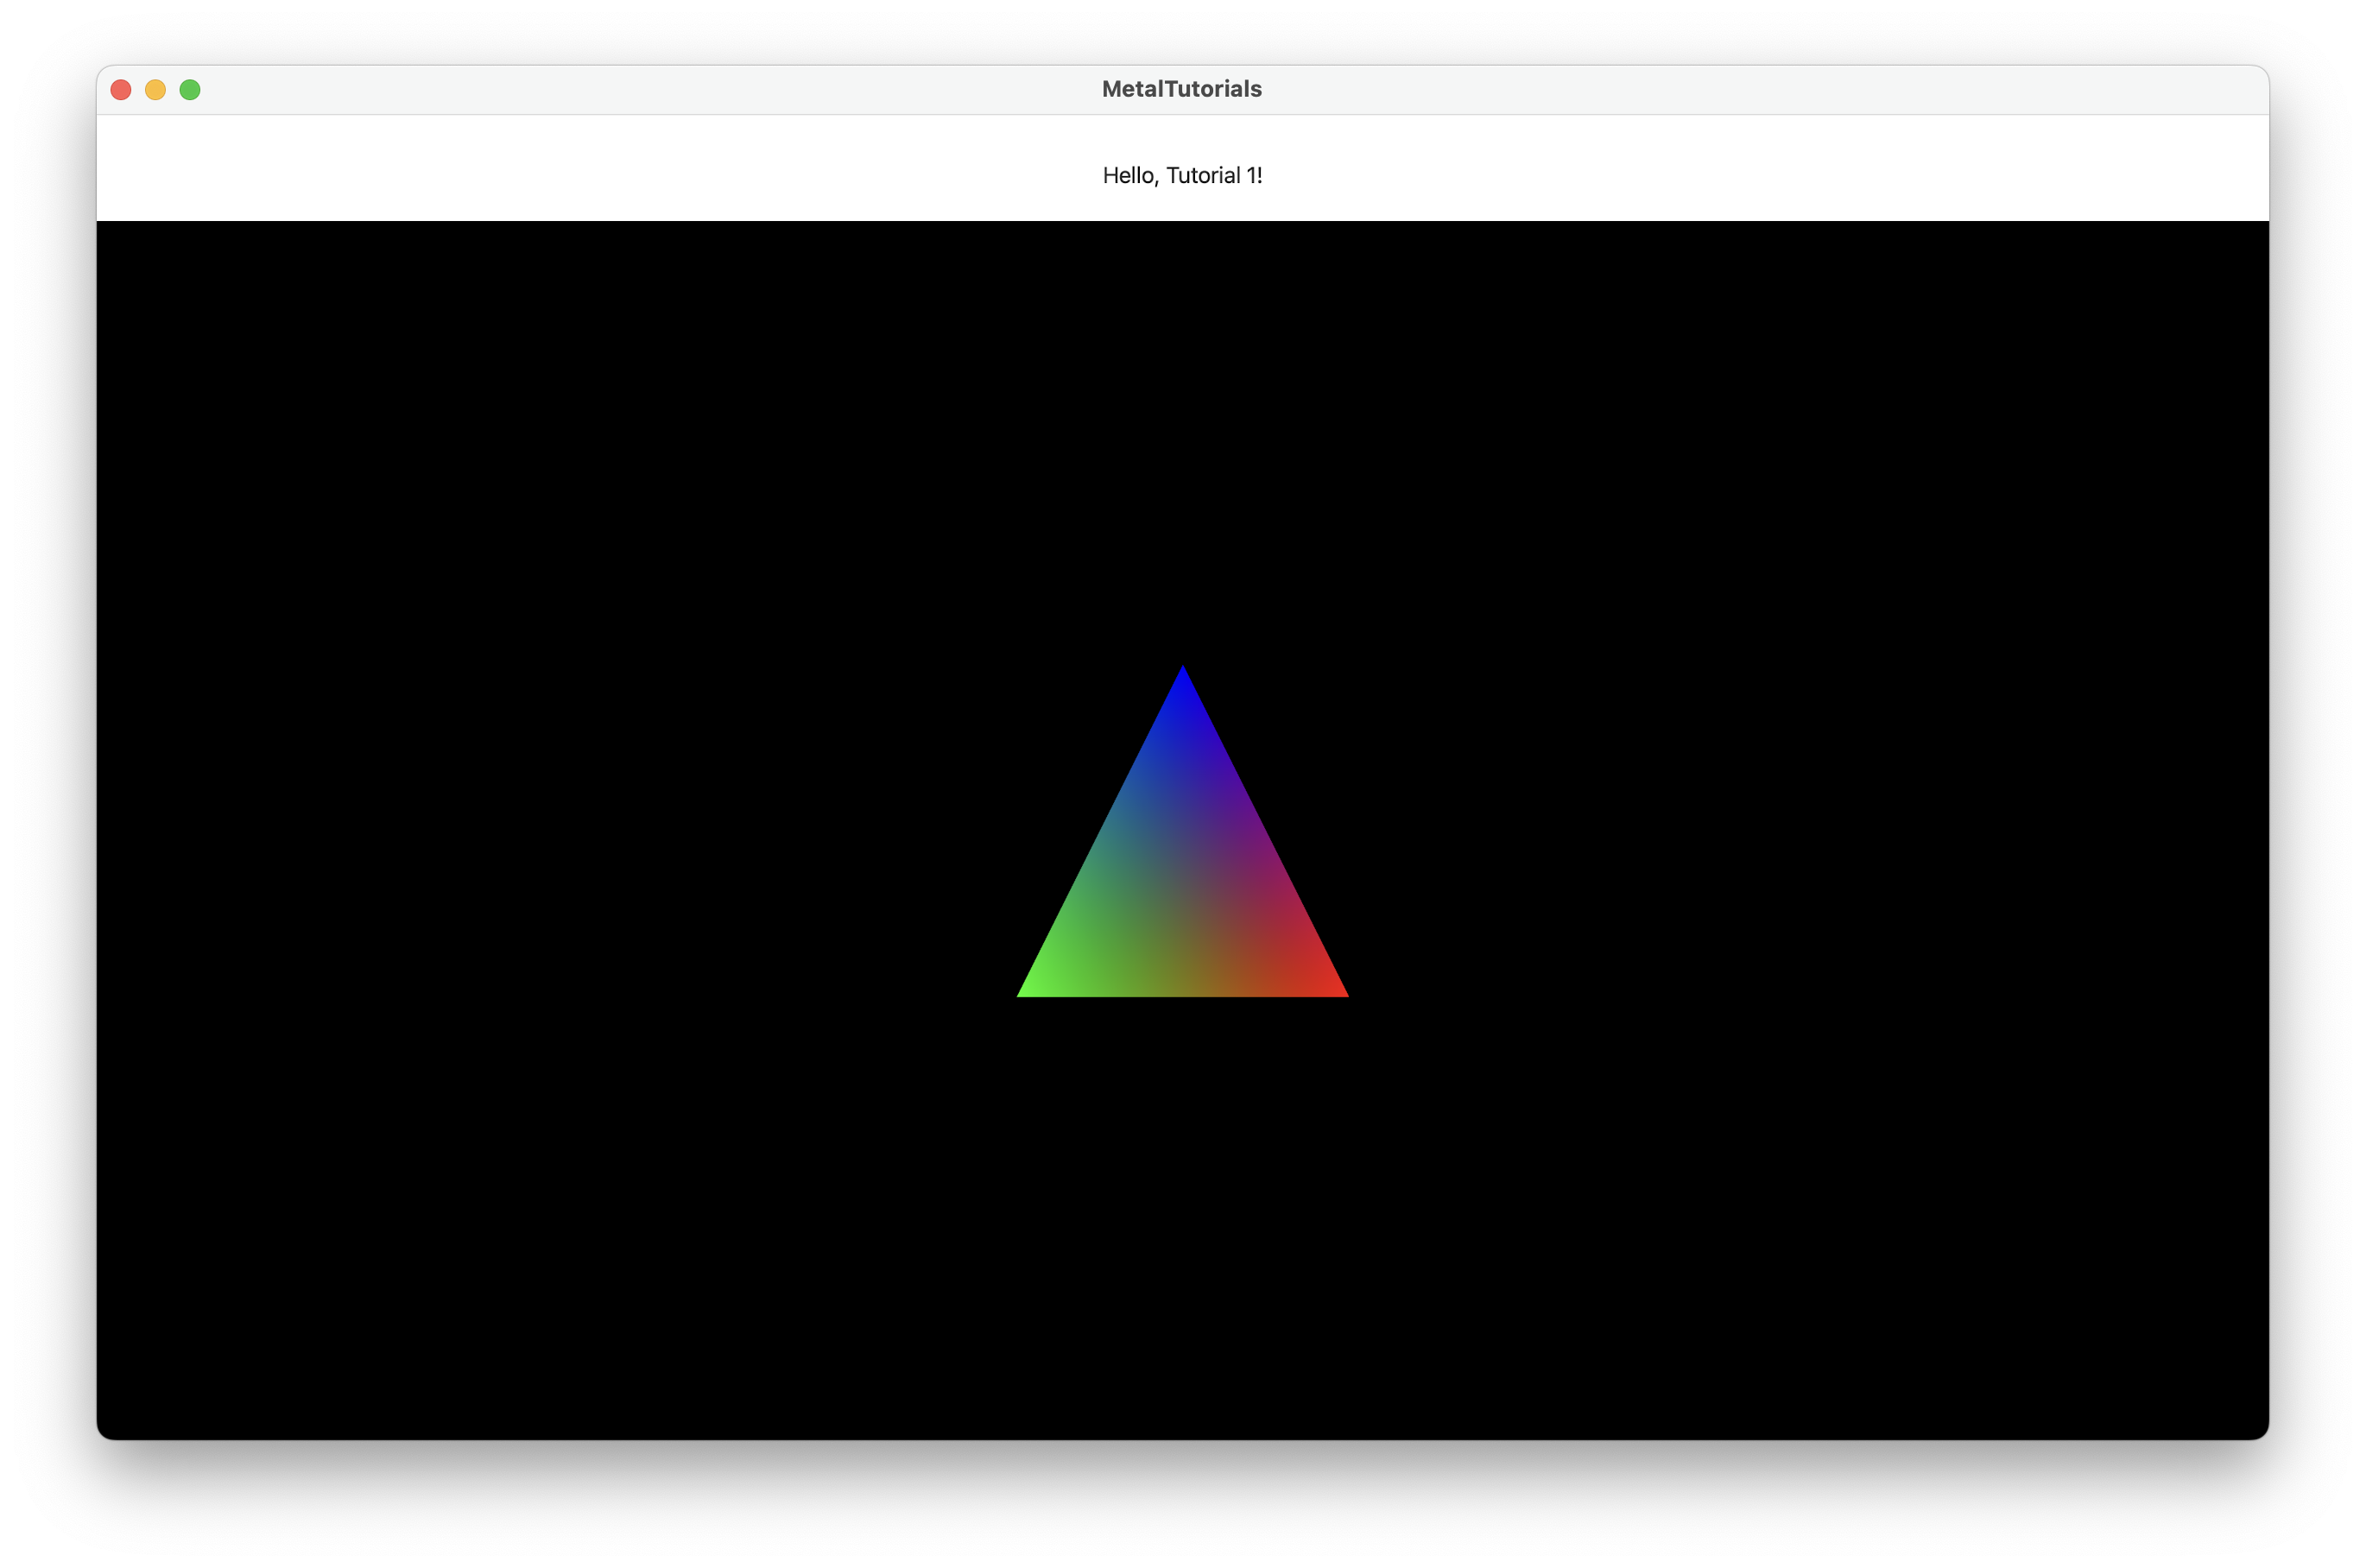
now run the project, and you should see this window:
Code 🧑💻
This first example is really simple, we have only one swift file and one metal file :
MT1Simple2DTriangleMetalView.swiftMT1HelloShaders.metal
Swift
Let’s start with the swift file :
struct MT1Simple2DTriangleMetalView: UIViewRepresentable {
    typealias UIViewType = MTKView

    /**
      Main class that is managing all the rendering of the view.
      It is intialized with the parent MetalView that use also to take the mtkview
     */
    class MTRenderer : NSObject, MTKViewDelegate {
....
MT1Simple2DTriangleMetalView is a UIViewRepresentable that can be used in SwiftUI to visualize a UIVIew as MTKView (the base view for Metal).
Because this is a really easy example we have the delegate object MTKViewDelegate, which is going to render our View inside the struct.
This delegate is also the coordinator of the view :
/// the coordinator is our renderer that manages drawing on the metalview
func makeCoordinator() -> MTRenderer {
    return MTRenderer(metalView: mtkView)
}
...
func makeUIView(context: UIViewRepresentableContext<MT1Simple2DTriangleMetalView>) -> MTKView {
        mtkView.delegate = context.coordinator
...
The Renderer
Our renderer is initialized from a MTKView and it expects the MTLDevice to be already set inside the view.
guard let device = MTLCreateSystemDefaultDevice() else {
    fatalError( "Failed to get the system's default Metal device." )
}
mtkView.device = device
To render our triangle we need a vertex and fragment shader. look at this if you don’t know what they are. Those are going to setup our minimal pipeline where the vertices of our triangle are processed and our triangle is rasterized and divided into multiple fragments. Thus, we need to bind those shader function to a render pipeline.
First, we create a library to place our shader functions and then we create the fuction objects to bind :
let library = _device.makeDefaultLibrary()!

//create the vertex and fragment shaders
let vertexFunction = library.makeFunction(name: "MT1::VertexShader")
let fragmentFunction = library.makeFunction(name: "MT1::FragmentShader")
With those, we can create our render pipeline state which will describe what our draw call is going to do when called. We also ensure that the output of the render pipeline has the same pixel format of our metal view where we are going to place our rendered texture.
//create the pipeline we will run during draw
//this pipeline will use the vertex and fragment shader we have defined here
let rndPipStatDescriptor = MTLRenderPipelineDescriptor()
rndPipStatDescriptor.label = "Tutorial1 Simple Pipeline"
rndPipStatDescriptor.vertexFunction = vertexFunction //< bind vertex
rndPipStatDescriptor.fragmentFunction = fragmentFunction //< bind fragment
rndPipStatDescriptor.colorAttachments[0].pixelFormat = _metalView.colorPixelFormat //< ensure correct pixel format
do {
    _pipelineState = try _device.makeRenderPipelineState(descriptor: rndPipStatDescriptor)
}
catch
{
    _pipelineState = nil
    print(error)
}
Now let’s render this triangle :
/// triangle definition 2D
let triangleVertices:[MT1Vertex] = [
        // 2D positions,                                     RGBA colors
    MT1Vertex(position:  vector_float2(250,  -250), color: vector_float4(1, 0, 0, 1 )),
    MT1Vertex(position: vector_float2(-250,  -250), color: vector_float4(0, 1, 0, 1 )),
    MT1Vertex(position: vector_float2(   0,   250), color: vector_float4(0, 0, 1, 1 ))
    ]
We need to send the pipeline with our triangle vertices to the MTLDevice (our GPU). We encode our render commands into a queue to submit. A queue can have multiple command buffers and allows you to encode commands in parallel.
We create a queue from the device :
_commandQueue = _device.makeCommandQueue()
then during drawing of the view func draw(in view: MTKView), we create a new command buffer where we are going to put our render pass.
A MTLRenderCommandEncoder object will be responsible for encoding our commands into the buffer for the current pass description (that we take from the view).
 /// create the new command buffer for this pass
let commandBuffer = _commandQueue.makeCommandBuffer()!
commandBuffer.label = "Tutorial1Commands"

if let passDesc = view.currentRenderPassDescriptor {

    // now creates a render command encoder to start
    // encoding of rendering commands
    let commandEncoder:MTLRenderCommandEncoder! = commandBuffer.makeRenderCommandEncoder(descriptor: passDesc)
    commandEncoder.label = "Tutorial1RenderCommandEncoder"
Now we can encode our render commands that are going to draw our triangle :
// init the MTLViewport from the metal library
let viewport = MTLViewport(originX: 0.0, originY: 0.0, width: Double(_viewportSize.x), height: Double(_viewportSize.y), znear: 0.0, zfar: 1.0)
commandEncoder.setViewport(viewport)

commandEncoder.setRenderPipelineState(_pipelineState!)

commandEncoder.setVertexBytes(triangleVertices, length: MemoryLayout<MT1Vertex>.size*3 , index: 0 )

commandEncoder.setVertexBytes(&_viewportSize, length: MemoryLayout<vector_uint2>.size, index: 1)

// encode the draw call
commandEncoder.drawPrimitives(type: MTLPrimitiveType.triangle, vertexStart: 0, vertexCount: 3)

commandEncoder.endEncoding()
After rendering we want to display the rendered image in our view.
We take the MTLDrawble from our view and we present our render into it.
Finally we commit the buffer to the queue so that it can be executed.
let drawable:MTLDrawable! = view.currentDrawable
commandBuffer.present(drawable)
commandBuffer.commit()
🎉 That’s it all we need to setup the rendering our triangle with metal in swift.
Metal
Our shader code is really simple in this case, first let’s see the structures that are going to be used both on our swift code and on our metal code. We are going to define those structs into an header file and include them into a bridge header.
//  This structure defines the layout of vertices sent to the vertex
//  shader. This header is shared between the .metal shader and C code, to guarantee that
//  the layout of the vertex array in the C code matches the layout that the .metal
//  vertex shader expects.
typedef struct
{
    vector_float2 position;
    vector_float4 color;

} MT1Vertex;
Vertex Shader
Our vertex shader is only going to scale our 2D vertex based on the size of the viewport passed as an input on the pipeline.
🔔 important to note that the [buffer(n)] attribute refers to the index we set on our command encoder
commandEncoder.setVertexBytes(triangleVertices, length: MemoryLayout<MT1Vertex>.size*3 , index: 0)
commandEncoder.setVertexBytes(&_viewportSize, length: MemoryLayout<vector_uint2>.size, index: 1)
The vertex_id attribute is a vertex function input attribute that is provided by metal and identifies each vertex processed.
We are going to use it to address our vertex buffer and retrieve our 2D vertex.
/**
     @brief simple vertex shader for small buffers of vertices
     - Parameter vertices: as [[buffer(0)]] ( only for single-use data smaller than 4 KB )
     - Parameter viewportSizePointer: as [[buffer(1)]] passed like vertices but it is only the data for the viewport size

     - Returns: output to the fragment shader
     */
    vertex RasterizerData
    VertexShader(uint vertexID [[vertex_id]],
                    constant MT1Vertex *vertices [[buffer(0)]],
                    constant vector_uint2 *viewportSizePointer [[buffer(1)]])
    {
        RasterizerData out;

        // Index into the array of positions to get the current vertex.
        // The positions are specified in pixel dimensions (i.e. a value of 100
        // is 100 pixels from the origin).
        float2 pixelSpacePosition = vertices[vertexID].position.xy;

        // Get the viewport size and cast to float.
        vector_float2 viewportSize = vector_float2(*viewportSizePointer);


        // To convert from positions in pixel space to positions in clip-space,
        //  divide the pixel coordinates by half the size of the viewport.
        out.position = vector_float4(0.0, 0.0, 0.0, 1.0);
        out.position.xy = pixelSpacePosition / (viewportSize / 2.0);

        // Pass the input color directly to the rasterizer.
        out.color = vertices[vertexID].color;

        return out;
    }
Fragment Shader
The fragment shader is only taking the color interpolated by metal and writes it in our attachment. The stage_in attribute simplify the reuse of shader code, with the ability to automatically bind buffers based on our pipeline (no need to specify the index of the buffer).
/**
Using the stage_in attribute, the shader can look at the pipeline’s vertex descriptor and
see what format the input buffer is in, and then match it with the struct as declared in the argument
*/
fragment float4 FragmentShader(RasterizerData in [[stage_in]])
{
// Return the interpolated color.
return in.color;
}
🎉 Congrats ! You ended your first metal tutorial !
Try to modify the vertices and the shader code to test your comprehension !